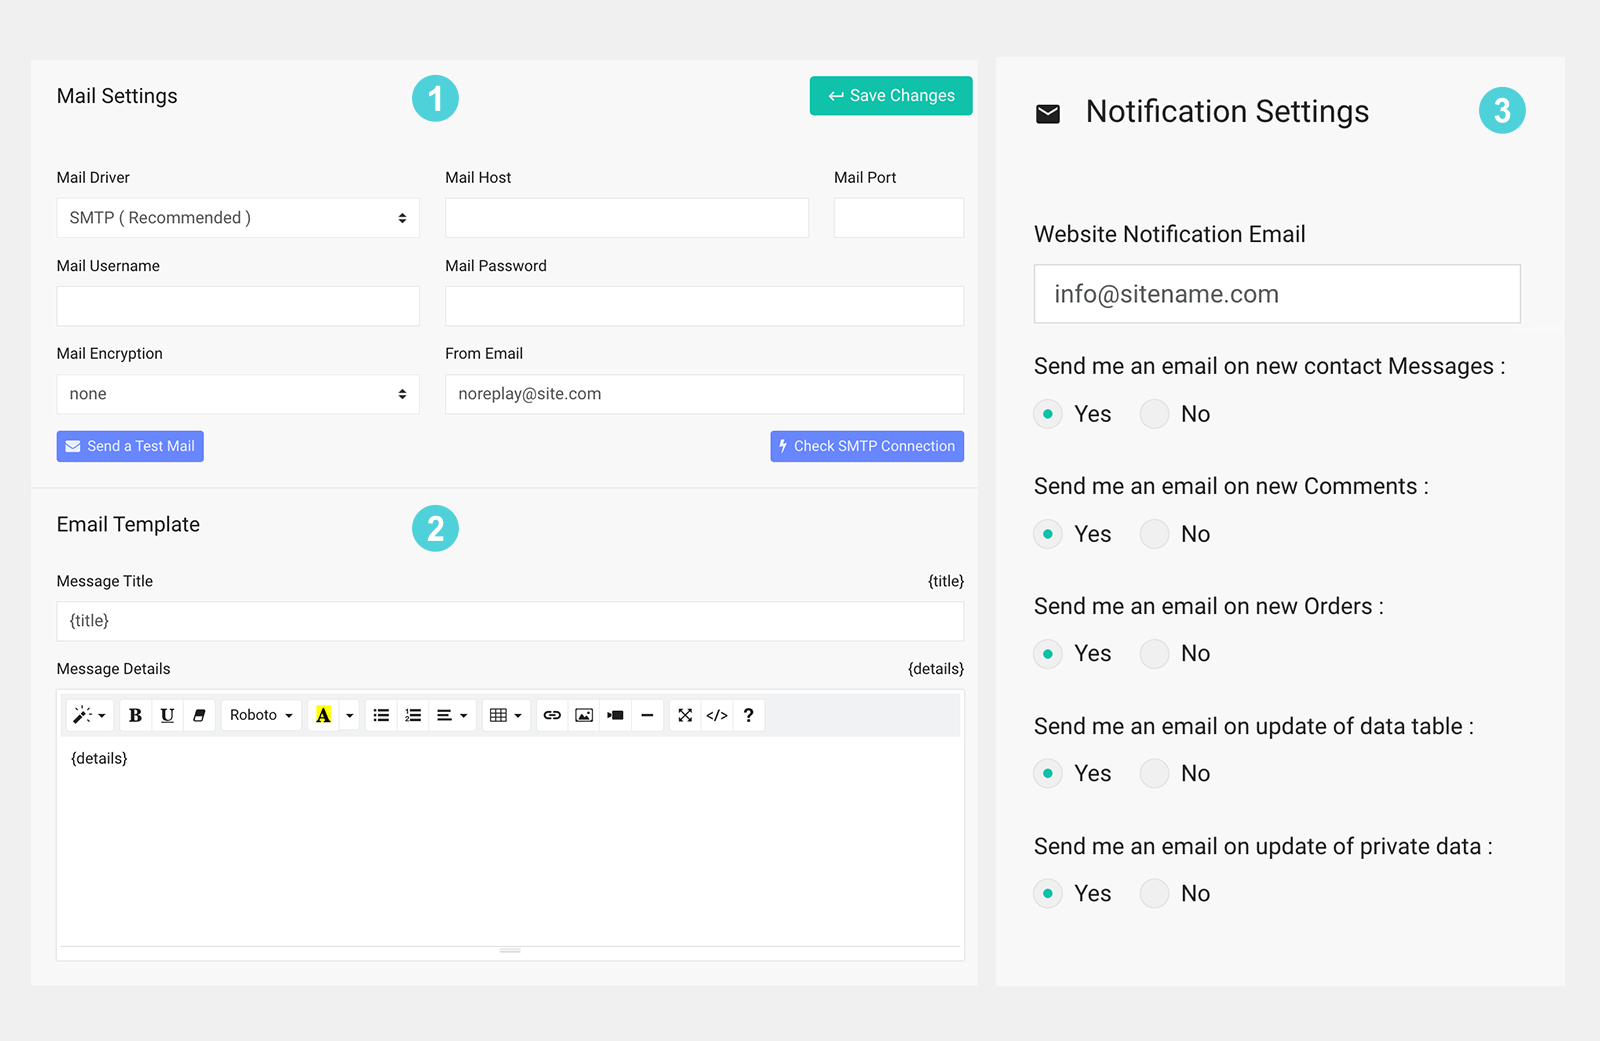
1. Mail Settings Configuration
The Mail Settings section allows you to configure how emails are sent from your website, such as contact forms and notifications. Follow the steps below to set up your mail configuration:
Access Mail Settings:
Navigate to Dashboard → System Settings → Mail Settings.
Mail Settings Fields:
-
Mail Driver:
Select the email delivery protocol.- SMTP (Recommended): For secure and reliable email delivery.
- Others may include Sendmail, Mailgun, etc., depending on the CMS version./li>
-
Mail Host:
Enter the SMTP server address (e.g., `smtp.yourmailprovider.com`). -
Mail Port:
Specify the port used for email sending. Common ports:
- 465 for SSL or TLS
- 587 for non-encrypted connections
-
Mail Username:
Enter the email address used to authenticate with the mail server. -
Mail Password:
Enter the password for the email account. -
Mail Encryption:
Choose the type of encryption for secure email communication. Options:- None
- SSL
- TLS
-
From Email:
Specify the sender's email address that will appear in the "From" field of outgoing emails. In Most of the servers it must be the same email used in Mail Username.
Actions:
- Send a Test Mail: Click this button to send a test email to verify the configuration.
- Check SMTP Connection: Test the connection between your website and the SMTP server. This feature may not work with some providers like Gmail.
2. Email Template
You can customize the default email message template:
- Message Title: Use dynamic placeholders like `{title}` for the subject.
- Message Details: Use the rich text editor to format the body of the email. Include placeholders like `{details}` for dynamic content.
Once all fields are correctly filled, click Save Changes to apply your settings.
3. Notification Settings Configuration
The Notification Settings section manages how the system sends email notifications to site administrators based
on specific events.
Access Notification Settings:
Navigate to Dashboard → Website Settings → Notification Settings.
Website Notification Email:
The email address that will receive all system notifications. You can use multiple emails separated by comma ","
Notification Preferences:
Enable or disable email notifications for the following events:
- New Contact Messages: To receive an email when a new contact form submission is made.
- New Comments: to receive an email when a new comment is posted on the site.
- New Orders: to receive an email when the order form submitted.
- Data Table Updates: to receive an email when data tables are updated.
- Private Data Updates: to receive an email when private user data is updated.
Once you have configured the notification preferences, click Save Changes to apply your settings.
Important Notes:
- Ensure that the SMTP server credentials are accurate to avoid email delivery issues.
- If you face issues with SMTP, verify the port, encryption, and authentication settings with your email provider.
- Use the Test Mail feature regularly after changes to verify functionality.
- Regularly update the website notification email to ensure timely communication for critical site events.
 Smartend
